Why is hand stamped jewelry expensive to buy? Take a look at the image below and the supplies needed to make these popular stamped disks! We decided to add them into our shop this year before the holidays, since they are a popular Christmas gift idea :) If you want to make something for yourself, you will not likely need everything shown in this photo, but you'll need a lot of the tools. If you're wanting to make & sell this jewelry, then I would suggest purchasing everything here so you can offer a lot of different options.
Simple Hand Stamped Initial Necklace
SUPPLIES
- 3-4" steel bench block
- 3-4" rubber block
- brass hammer/mallet (2 lbs)
- household hammer, or nylon hammer (or both!)
- steel letter & number stamping set
- extra fine sharpie, black
- 0000 steel wool
- jewelry pliers
- metal hole punch pliers (1.25mm) -
(optional- you can purchase stamping disks with or without connecting holes for jump rings)
- stamping discs (20-22 gauge, 8-12mm round)
- chain (I used 1mm brass cable chain)
- lobster clasp
(optional if you have a pre-made chain)
- jump rings
- head pins
(optional)
- crystal or gemstone bead of your choice (
optional)
INSTRUCTIONS
1. Choose Your Letter Stamp
I took this picture to show you just a couple different options. You can choose uppercase, lowercase, tiny & larger sized letters. There are many different stamp sets you can purchase with different fonts, including cursive!
2. Create Hole for Jump Ring
Using your
metal hole punch pliers, create a small hole for your jump ring near to the top of the disk.
(It will look like this)
3. Center Your Letter Initial
Place your disk on top of the bench block where you will be hammering. It can be difficult to center your letter initial perfectly, and you'll most likely need a couple disks to practice on :) A little trick that's helpful if you have a shiny surface is to use your disk as a mirror so you can see where you are placing your letter.
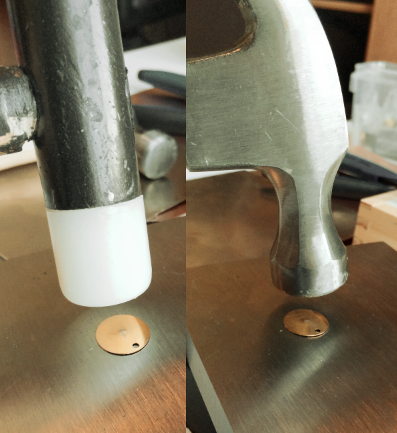
4. Stamp Your Disk
Once you have your steel initial stamp centered, place your brass hammer lightly on top of it, and then with one swing, hammer down hard (depending on the hardness of the metal) to create the indent into your disk. If you hammer more then once, you'll risk having multiple indentations of the letter initial that may not be in the exact spot - however, it may work if you hold the initial hard against the metal while hammering. If it so happens that your letter was not squared up with the metal, and the indentation is deeper in some areas, you can try to match up the stamping initial with the first by feeling where the grooves are with your stamp, and hammering down again to fix the problem. It may or may not work as you wish!
5. Flatten Your Disk
After stamping your initial, your disk will likely warp from the impact. Turn your disk over and use your household or nylon hammer to flatten the disk back how it was.
6. Darken Letter Initial
Using an extra fine black Sharpie, color deep into the initial grooves (you may need to cover the entire initial to make this happen). After doing so, use a small piece of steel wool to rub off the black marker until only the letter initial is left darkened.
(another example)
7. Attaching to the Chain
After finishing your chain (using jewelry pliers, jump rings and a clasp, unless you purchased a pre-made chain), attach a jump ring to your letter initial and place onto the chain. You can use a headpin and a bead of your choice to add a pop of color to your necklace.
Example of finished necklace
-Megan